Using LEGO Boost / WeDo 2.0 / PoweredUp with Scratch and S2Bot
The S2Bot app allows you to control LEGO Boost or LEGO WeDo 2.0 from within your Scratch (or Snap!) project running on a desktop computer (Windows, Mac, Linux, Chromebook). A BLED112 dongle is required to provide the bluetooth connection on the computer.
The LEGO 'Powered Up' hub (as supplied with trains or batmobile kit) may be also be used.
Supported features include:
- wireless bluetooth connection to the LEGO hub
- detect tilt, distance, colour, position using LEGO sensors
- control LEGO motors with varying speeds
- change colours of the RGB LED light on the hub
- create sounds on the piezo sounder (WeDo only)
What you will need:
- A LEGO Boost (17101) or LEGO WeDo 2.0 (45300) set or LEGO PoweredUp set (train, batmobile)
- Windows/Mac/Linux/Chromebook computer
- BLED112 bluetooth dongle (not required for Chromebooks). No other type of dongle is compatible.
- Batteries for the LEGO hub.
Initial Installation:
- Install the S2Bot App from here
- Insert the BLED112 bluetooth dongle and let the driver install (more details here)
- Start the S2Bot App.
- Select 'LEGO WeDo 2.0' or 'LEGO Boost' or 'LEGO PoweredUp' from the drop down list of devices
Using the S2Bot App:
- Select 'LEGO WeDo 2.0' or 'LEGO Boost' or 'LEGO PoweredUp' from the drop down list of devices
- Click the 'Scan for devices' button.
- You should see your LEGO hub appear in the list of bluetooth devices. If you do not see the hub press the green button so that the LED starts flashing (and you can also try restarting the S2Bot app). Remember the hub can only connect to one device at a time (so cannot connect to the BLED112 dongle if already connected to an iPad or tablet).
- Click on the hub name to connect it (no pairing is required).
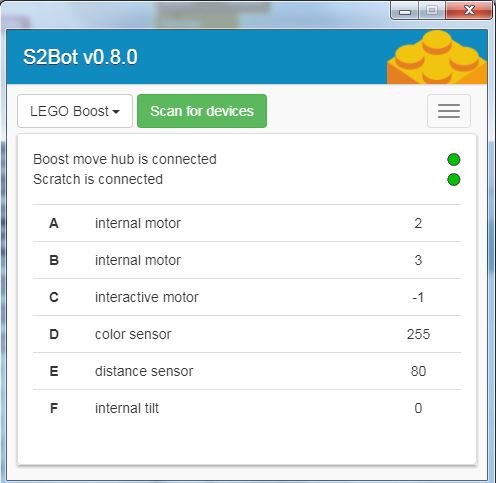
- When connected (takes 5 seconds or so) you will see tilt/motor data etc on screen.
- Click 'Close' to close the connection dialog.
- Click on the menu button (top right) and select 'New Scratch template'. Save the .sb2 template to your desktop.
Using Scratch:
- In Chrome browser go to https://scratch.mit.edu and click Create (or start the offline version of Scratch)
- From the File menu select 'Upload from your computer'
- Select the .sb2 template file you saved earlier on your desktop.
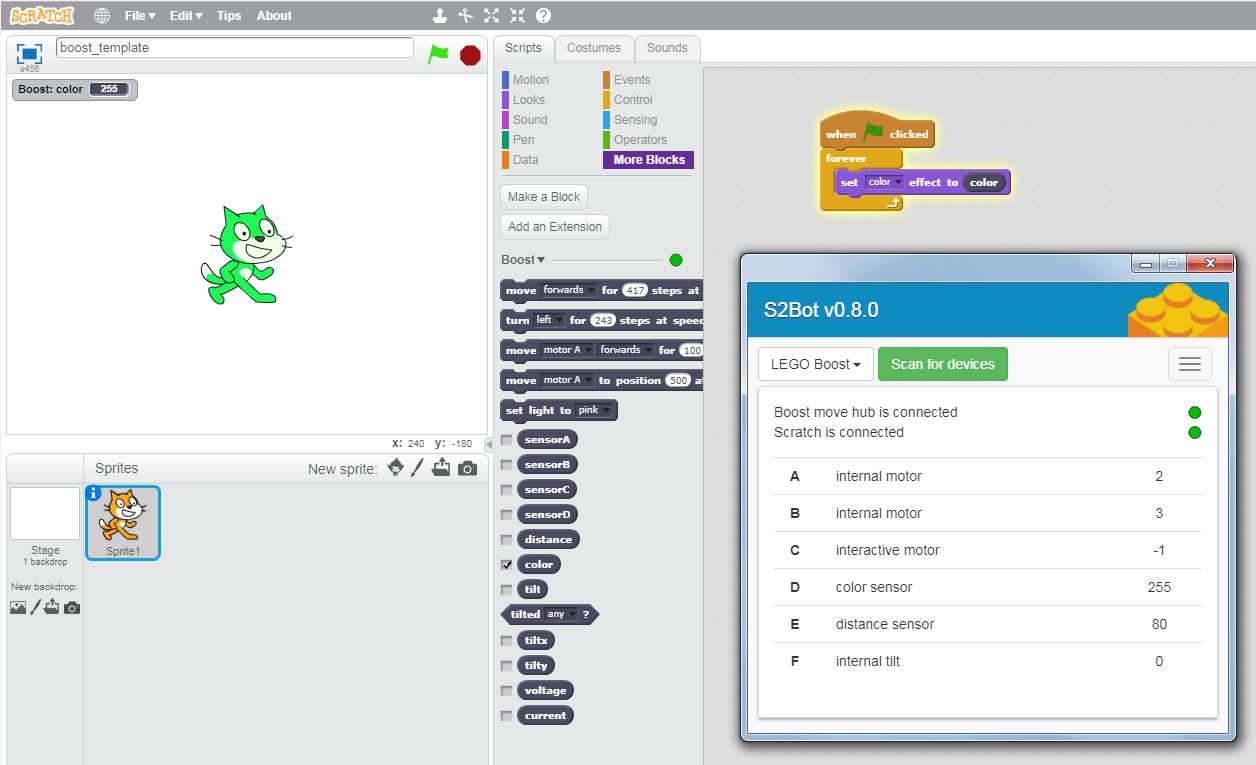
- Scratch should now automatically 'connect' to S2Bot and the new blocks will be available in the 'More Blocks' section. You can tell if Scratch and S2Bot are connected via the green 'connected' LED in both applications.
Input Sensors and Outputs
| LEGO Boost (17101) |
LEGO Batmobile (76112) LEGO Passenger Train (60197) LEGO Freight Train (60198) |
LEGO WeDo 2.0 (45300) | |
| RRP | RRP £149.99 (inc VAT) (but £120 online) | RRP e.g. 76112 Batmobile £89.00+ (inc VAT) | RRP £144.00 (inc VAT) |
| Contents: |
Move hub, interactive motor, colour/distance sensor 847 bricks |
PoweredUp hub, 2 x medium motor (batmobile) |
Smart hub, medium motor, tilt sensor, motion sensor 280 bricks |
|
Power Supply
Motor Output Voltage Sensor Voltage |
9V (6xAAA battery)
9V 3V |
9V (6xAAA battery)
9V 3V |
3V (2xAA battery), (or 45302 rechargeable pack) 5V (internal voltage boost) 3V |
|
Hub Internal Inputs/Outputs |
2 Interactive Motors (with sensor) RGB Light - Tilt Sensor Current Sensor Voltage Sensor Button push switch |
- RGB Light - - Current Sensor Voltage Sensor Button push switch |
- RGB Light Piezo sounder - Current Sensor Voltage Sensor Button push switch |
|
External Inputs/Outputs (2 hub ports available) |
Interactive Motor (with sensor) Combined colour / distance sensor
(Other sensors may be used) (88005 Lights may be used) |
Medium Motors or Train Motor
(Other sensors may be used) (88005 Lights may be used) |
8883 M (medium) Motor 9584 Tilt Sensor 9583 Motion Sensor
(Other sensors may be used) (88005 Lights may be used) |
Motors
The WeDo/PoweredUp medium or train motors can be switched on for a period of time at various different speeds.
The Boost set has 3 interactive motors, 2 internal (A and B) and 1 external (port C or D). These interactive motors have a position sensor that counts the number of steps moved, so are far more accurate and versatile than the WeDo M motor. The ‘sensor’ variable (e.g. sensorA) feeds back the step position of that particular motor.
The interactive motors can therefore be used in 4 different ways:
- For a period of time at various different speeds.
- Move ‘X’ steps in either direction. This is useful for moving a robot a certain distance, for instance the Vernie model uses 417 steps at speed 50 to move forward ‘1 grid space’. The number of steps to move will vary from model to model. For ease of use the 'move forward/backward' and 'turn left/right' blocks control both internal motors (A and B) at the same time.
- Move to position ‘X’. This is useful to move the motor to a known position, mimicking servo behaviour. For instance to move the Vernie model head back and forth you could move from position 50 to position -50. The actual position the motor stops at may be a couple of steps different to the target value, but is normally very close.
- As a position sensor. The steps rotated are counted even if the axle is manually turned by hand, which means the interactive motor can also be used as a position sensor. Connect an axle and gear and then turn the gear to change the position value.
RGB LED Light
The LED light on the hub may be changed to one of 10 colours (or switched off entirely).
Piezo Sounder
The WeDo smart hub has an internal piezo sounder that can play notes. There is no sounder inside the Boost move or PoweredUp hub.
Tilt Sensor
The WeDo tilt sensor is external, the Boost tilt sensor is inside the move hub. However they both give a value 0-5 in the ‘tilt’ variable depending on which way the sensor is leaning.
The Boost template also gives additional ‘tiltX’ and ‘tiltY’ variables for more detailed position information of the internal tilt sensor.
The WeDo external tilt sensor will also work if connected to the Boost move or PoweredUp hub. However for Boost the external tilt sensor value will only be available in the 'sensor' variable (as the 'tilt' variable is reserved for the Boost internal tilt sensor instead).
Motion and Colour/Distance Sensors
The WeDo motion sensor gives a value between 0 and 100 in the ‘distance’ variable, incrementing in steps of 10. It does not detect changes very close to the sensor.
The Boost colour/distance sensor is two sensors in one, giving both ‘distance’ and ‘color’ values at the same time. It also has a more accurate close up ‘distance’ resolution than the WeDo motion sensor, initially counting from 1 to 10 close-up and then counting in steps of 10 from 10 to 100.
The colour sensor identifies 6 main colours of LEGO brick and places the colour reference number in the ‘color’ variable – black (0), blue (3), green (5), yellow (7), red (9) and white (10). The brick should be held within 2 cm of the sensor to be identified, if no colour is detected the ‘color’ variable will contain the 'unknown' value 255. Other colours will simply be sorted to the nearest known colour, so for instance brown may be identified as 7 (yellow) and pink as 9 (red).
Voltage and Current Sensors
These internal sensors measure the current and control electronics voltage (around 3V) within the hub. For advanced projects the current variable value could be used to detect a ‘stalled’ motor.
Button sensor
This detects whether the button switch on the top of the hub is pressed (true/false).
Powered Up Hub/Remote
The powered up hub provides two external ports for motors/lights, however the Boost/WeDo2 sensors will also work in this hub. However it has been noted that use of two sensors at the same time can cause the hub to crash and disconnect - this firmware issue also occurs with two Boost interactive motors (as they have two internal sensors). Therefore we recommend that the powered up hub is used with one sensor and one output (motor/lights).
The powered up train remote may also be used connected to S2Bot instead of the hub. When connected the button presses on each side of the remote are avaialbale as different numbers in the sensorA and sensorB reporters. The button press values are Up (1), Down (255), Stop (127), Released (0)
Boost Model Assembly Instructions
Update 2018: LEGO changed their mind, official Boost model instructions are now available here.
Unusually, LEGO Boost does not come with printed assembly instructions, they are only supplied in electronic format within the Boost app. The reason, as clarified by LEGO, is that "the intended Boost experience is centered around a 'Build-Code-Play' experience and the intention is to encourage the users to begin to program the model behavior at designated points during the model build, so the users can get the full experience of bringing a model to life. These play-breaks allow the young users to have a break during building, and learn programming. Building with only the PDF circumvents the true LEGO Boost experience".
However Scratch users may want to work differently, to build and control models such as Vernie from Scratch (without using the LEGO app), so third party generated assembly instructions for the Boost models may be downloaded here in PDF format.
LEGO, Wedo, and Boost are trademarks of LEGO. S2Bot is not developed by or associated with or endorsed by or sponsored by LEGO. SBrick is a trademark of Vengit Ltd.