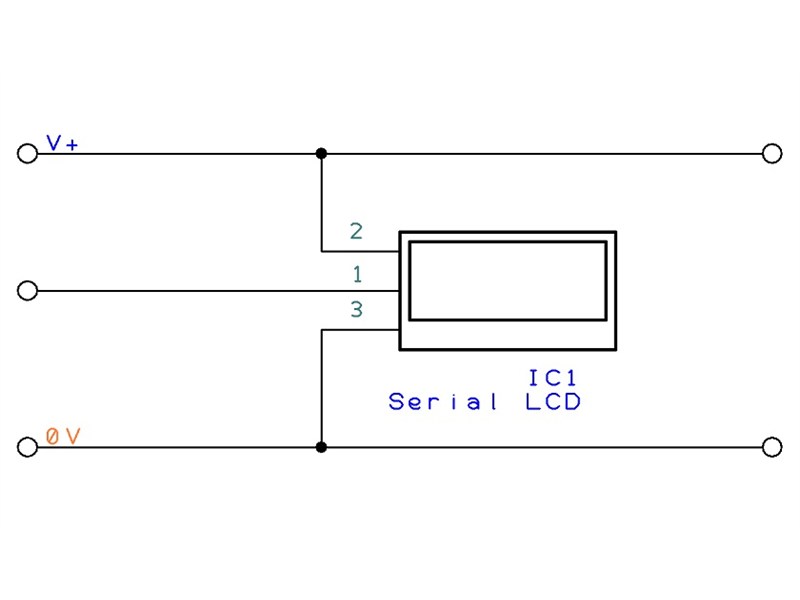
A serially controlled 128x64 graphical LCD (GLCD).
A graphical display allows each pixel of the screen to be set or cleared allowing monochrome images and arbitrary shapes to be displayed in addition to characters and digits.

A serially controlled 128x64 graphical LCD (GLCD).
A graphical display allows each pixel of the screen to be set or cleared allowing monochrome images and arbitrary shapes to be displayed in addition to characters and digits.
A demo of the serial GLCD module.
; FGC GLIC Graphics Interpreter Demo Programme (18X)
; Copyright FGC March 2006
;
; DEMO for GLIC-K1 (Samsung KS0108) controller.

; Pre-defined messages to be shoved into EEPROM for later recall.

; PICAXE Connections to GLIC
; PICAXE	GLIC I/F PCB
; Output7	SIN (Serial IN)
; Input0	ST (Status)

#picaxe18x

; First 16 bytes are for storing data read in (0 to 15)
DATA 0,(0,0,250,150,45)
DATA 16, ("FGC Graphics Interpreter")			'
DATA 40, ("Text used over & over")			' PICAXE EEPROM locations 40 to 62

; [DECLARE VARIABLES]

; Constants to Control GLIC
symbol ClearLCD  = 10					' Clear LCD Screen
symbol ClearImage= 12					' Clear Graphics only
symbol ClearText = 14					' Clear Text only
symbol Backlight = 20					' Switched backlight control
symbol StoreText = 50					' Store Text (max 30 chars) in EEPROM
symbol PrintAT   = 100					' Print string at Xt,Yt
symbol GetText   = 101					' Get from EEPROM and Print AT Xt,Yt
symbol PrintAW   = 120					' Print AT with Autowrap (one line only)
symbol PrintPage = 123					' print a page from EEPROM
symbol DoCircle  = 160					' Draw a circle
symbol DoSquare  = 165					' Draw a square
symbol FilledBox = 170
symbol DrawLine  = 155					' Draw Line or Lines
symbol PlotPix   = 150					' Plot pixel at Xg,Yg
symbol UnPlotPix = 151					' Unplot pixel at Xg,Yg
symbol Border    = 152					' Draw a Border
symbol Plot30    = 180					' Plot up to 30 data points in a bar chart
symbol XTitle    = 184             			' Print X axis ident (12 chars max)
symbol YTitle    = 185             			' Print Y axis ident (6 chars max)
symbol GTitle    = 186            			' Print Graph title
symbol Pointer1  = 200					' Plot Pointer
symbol Pointer2  = 210
symbol PrintImage= 221					' Print an Image

; Variables
symbol ILoop  = b2	          			' General loop counter
symbol JLoop  = b3					' A Spare loop counter
symbol GComm  = b4					' GLIC Command variable
symbol Char   = b5					' A Character

; Pins
symbol SO      = 7
symbol GStatus = input0

Pause 1500							' Allow GLCD to settle
serout SO,T2400,(ClearLCD)
pause 400							' Have a little pause

; [MAIN CODE BEGINS] *************************************************************************

; Send data FGC Graphic LCD driver IC
; followed by variables or string
; See FGC GLIC Data Sheet

GLCDloop:

    gosub ClearGLCD								' ClearLCD

    serout SO,T2400,(BackLight,1)						' Switch backlight ON
    pause 250

    serout SO,T2400,(printImage,1,1)						' print image in EEPROM #1

    pause 4000									' Long pause before looping

    serout SO,T2400,(printImage,1,2)						' print image in EEPROM #3

    pause 6000									' Long pause before looping

    'serout SO,T2400,(printImage,1,3)						' print image in EEPROM #3

    'pause 6000									' Long pause before looping

    'serout SO,T2400,(printImage,1,4)						' print image in EEPROM #3

    'pause 4000									' Long pause

    gosub ClearGLCD

    ;serout SO,T2400,(Border,0)							' Do Border. The ZERO means DON't clear LCD
    ;pause 300

    serout SO,T2400,(PrintAT,4,3,0," Normal Text")			' PRINT AT (Format 100,X,Y,Normal,"Text")
    pause 1000
    serout SO,T2400,(PrintAT,2,6,1," Inverted Text ")
    pause 3000

    gosub ClearGLCD

    serout SO,T2400,(PrintAT,0,7,0,"Draw a circle.")
    pause 1000

    serout SO,t2400,(DoCircle,1,60,30,20)					' Draw Circle X,Y (centre), radius
    pause 3000

    serout SO,T2400,(PrintAT,0,7,0,"Clear the circle. ")
    pause 1000

    serout SO,T2400,(DoCircle,0,60,30,20)					' Use a ZERO (2nd parameter) to clear the circle
    pause 2500

    serout SO,T2400,(PrintAT,0,7,0,"3Circle MultiCommand")			' PRINT AT (Blank over previous chars)
    pause 1000

    serout SO,T2400,(DoCircle,1,60,10,10,20,20,10,50,30,5)		' Print 3 circles: X,Y (centre),Radius  x  3
    pause 2500

    serout SO,T2400,(DoCircle,0,60,10,10)					' Clear circles sequentially
    pause 300									' Set=0 means clear
    serout SO,T2400,(DoCircle,0,20,20,10)
    pause 300
    serout SO,T2400,(DoCircle,0,50,30,5)
    pause 1000

    serout SO,T2400,(PrintAT,0,7,0,"A Square now.       ")
    pause 500

    serout SO,T2400,(DoSquare,1,60,30,40)					' Draw A square X,Y (centre), edgelength
    pause 3000

    serout SO,T2400,(DoSquare,0,60,30,40)					' Use a ZERO to clear the square
    pause 450

    serout SO,T2400,(PrintAT,0,7,0,"2 filled squares   ")
    pause 230
    serout SO,T2400,(FilledBox,1,80,30,24, 1,25,40,20)			' Two filled boxes
    pause 1500
    serout SO,T2400,(PrintAT,6,1,0,"Unfill Middle")
    pause 250									' Hollow out the middle of square 1
    serout SO,T2400,(FilledBox,0,80,30,16)					' 0 means paper fill
    sleep 2

    gosub ClearGLCD

    ' Now send a string and store it on the GLIC EEPROM
    serout SO,T2400,(PrintAT,0,1,0,"Store/Retrieve text")		' A little on-screen message
    pause 250

    serout SO,T2400,(StoreText,1)						' Initiate GLIC Store text Page 1
    for Iloop= 40 to 60
      read Iloop, Char								' Read from your PICAXE EEPROM ...
	serout SO,T2400,(Char)							' ... and send it out to GLIC
    next Iloop									' Allow time for GLIC to process/store
    pause 600									'

    serout SO,T2400,(GetText,1,0,2)						' Now retrieve the Text and place it at X,Y
    pause 300
    serout SO,T2400,(GetText,1,0,3)						' Use it again... anytime...
    pause 300
    serout SO,T2400,(GetText,1,0,4)						' .. and again... don't waste PICAXE space!
    pause 2000

    ; OR you can store text on GLIC's EEPROM like this:
    serout SO,T2400,(StoreText,2,"Saved in EEPROM")			' Store this on EEPROM page 2
    pause 250

    serout SO,T2400,(GetText,2,1,7)						' Read page 2 and print on line 6 col 1
    pause 2000
    sleep 2

    gosub ClearGLCD

    serout SO,T2400,(Printpage, 26,32)						' Print previously stored page
    pause 9000

    ; Lets plot a simple barchart (30 data points maximum)

    gosub ClearGLCD

    serout SO,T2400,(GTitle,"My Barchart")					' Put in the Graph title (14 chars max)
    pause 300

    serout SO,T2400,(XTitle,"1995 to 2007")				' Print the X axis title (14 chars max)
    pause 300

    serout SO,T2400,(YTitle,"Births")					' Print the Y axis title (6 chars max)
    pause 300

    serout SO,T2400,(Plot30,0,25,35,85,34,23,35,176,31,29)		' Plot (0 = WITHOUT Clear Screen command)
    pause 5000

    gosub ClearGLCD

    serout SO,T2400,(PrintAT,0,0,0,"A Pointer")				' Print Title
    pause 350

    for ILoop = 0 to 250 step 5
      serout SO,T2400,(Pointer1,70,32,25,ILoop,1)			' Plot Pointer X,Y,Size,Angle,Set
      ;do										' Move it round in a loop
      ;loop until GStatus=1
      pause 150
    next ILoop									' GLIC auto deletes previous for animation.

    serout SO,T2400,(PrintAT,0,0,0,"2 Pointers")				' Print Title
    pause 350

    for ILoop = 250 to 0 step -10
	JLoop=250-Iloop
      serout SO,T2400,(Pointer1,70,32,25,ILoop,1)			' Plot Pointer X,Y,Size,Angle,Set
      ;do
      ;loop until GStatus=1							' Move it round in a loop
      pause 150
	serout SO,T2400,(Pointer2,25,40,15,JLoop,1)
      ;do
      ;loop until GStatus=1
      pause 150
    next ILoop

    serout SO,T2400,(PrintAT,15,6,0,"Easy!")
    pause 3000

    gosub ClearGLCD

    serout SO,T2400,(PrintAT, 7,5,0,"Draw Lines")
    pause 250

    serout SO,T2400,(DrawLine,1,1,60,50,60)				' Draw a single line
    pause 300

    serout SO,T2400,(DrawLine,1,50,1,20,30,20,30,80,30,80,30,50,1)	' Draw a number of lines
    pause 300									' ... A MultiCommand

    serout SO,T2400,(PrintAT, 0,6,1," Single or Multiple ")
    pause 4000

    gosub ClearGLCD								' Another way of using Draw:
    serout SO,T2400,(PrintAT,1,6,0,"A Grid.."): Pause 300		' If you output data quickly
											' after DrawLine you can draw
											' a number of lines in one go.
    serout SO,T2400,(DrawLine,1)						' So, initiate DrawLine.. then
    for ILoop=60 to 120 step 10						' output up to 7 x Coord pairs
      serout SO,T2400,(ILoop,5,Iloop,53)					' in a single hit
    next Iloop									' (X1,Y1,X2,Y2) = a Coord pair
    pause 320									'  (Limit 28 bytes)

    serout SO,T2400,(DrawLine,1)						' Initiate DrawLine again
    for ILoop=5 to 53 step 8							' Do the vertical lines
      serout SO,T2400,(60,ILoop,120,Iloop)					' Up to 7 Coord pairs
    next ILoop
    pause 3000

    serout SO,T2400,(PrintAT,0,0,0,"Plot")					' PrintAT
    pause 300

    serout SO,T2400,(PlotPix)							' Initialise 'plot pixel' command
    for Iloop=10 to 40 step 2							' Send a number of points
      serout SO,T2400,(ILoop,ILoop)						' 14 data pairs maximum (X,Y = 1 data pair)
    next ILoop
    pause 250
    serout SO,T2400,(PlotPix)							' Reinitialise for another set of points
    for Iloop=10 to 40 step 2							' Send a number of points
      JLoop=40 - ILoop								' Reverse values
      serout SO,T2400,(JLoop,ILoop)						' 14 data pairs maximum (X,Y = 1 data pair)
    next ILoop
    pause 3000

    serout SO,T2400,(PrintAT,0,0,0,"UnPlot")				' PrintAT
    pause 270

    serout SO,T2400,(UnPlotPix)							' Initialise plot pixel
    for Iloop=10 to 40 step 2							' Send a number of points
      serout SO,T2400,(ILoop,ILoop)						' 14 data pairs maximum (X,Y = 1 data pair)
    next ILoop
    pause 250
    serout SO,T2400,(UnPlotPix)							' Reinitialise for another set of points
    	for Iloop=10 to 40 step 2							' Send a number of points
      	  JLoop=40 - ILoop								' Reverse values
      	  serout SO,T2400,(JLoop,ILoop)						' 14 data pairs maximum (X,Y = 1 data pair)
    	next ILoop
    	pause 3000

	goto GLCDloop

; SUBROUTINES  *********************

ClearGLCD:
	serout SO,T2400,(ClearLCD)					; Clear LCD
	pause 300
	return
Copy Code
Submit an Example
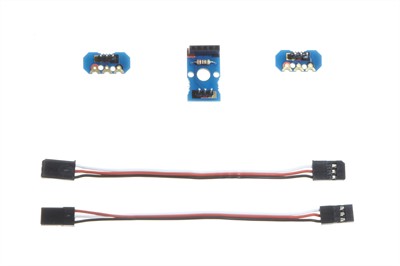
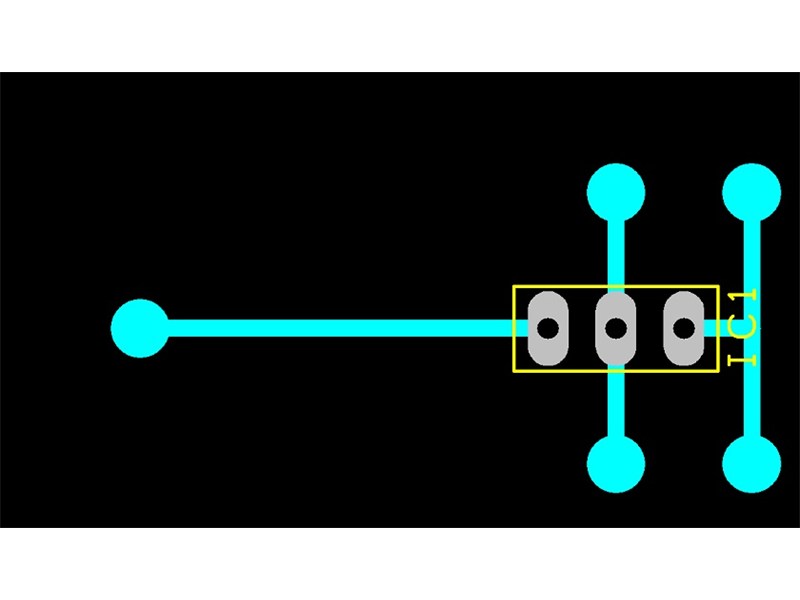
The Serial GLCD is connected via a 3 wire cable to the servo create module.
| Description | Code | Qty | |
|---|---|---|---|
| Serial Graphic LCD (GLCD) Module | LED042 | 1 | Buy Now |
| 3-pin 0.1" header | CON035 | 1 | Buy Now |
You must be logged in to submit code examples. Login now.
Share